CI/CD for your CV
In this guide I will show you how to setup Github Actions to generate your CV and upload it to your project release.
How does it Work?
When you push changes to the main branch, a workflow starts. This workflow uses pandoc to convert markdown to pdf.
    ---
title: CV CI/CD Workflow
---
flowchart TD
  user([User])
  repo([GitHub Repository])
  gh_action([GitHub Action Runner])

  user -- Push CV --> repo
  repo -- Triggers --> gh_action
  gh_action --> github_actions

  subgraph github_actions ["GitHub Actions"]
    deps[Install Dependencies]
    md_css[Markdown + CSS]
    pandoc[Pandoc]
    pdf[Generate PDF]
    release[Create GitHub Release]

    deps --> pandoc
    md_css --> pandoc
    pandoc --> pdf
    pdf --> release
  end
Repository Layout
The basic file tree we will create looks like:
- build.yaml
- default.css
- normalize.css
- John_Doe.md
- Justfile
Let’s discuss each file and directory in more details:
markdown Directory
Allows you to define multiple versions of your CV.
For example, you might have a CV for a developer role and another for a sysadmin role. While you can use separate git branches, it’s more convenient to edit shared assets like CSS or workflow files without dealing with branches.
markdown/John_Doe.md
This is where your CV content goes. Simply write your CV in markdown format.
For example:
# John Doe

#### Senior developer that puts a lot of attention to security
###### [ [ john_doe@example.com ](mailto:john_doe@example.com) ] . [ [ +111-22-333-4444 ](tel:+111-22-333-4444) ] . [ [ Github ](https://github.com/ShaharNaveh/) ]

## Experience

### **Software Devloper @ Example Company** (1970-Preset)

Screamed at screens to get things done.

## Skills

- Version Control & CI/CD: Git, Github Actions

- Networking: Advanced expertise in networking and internet protocols

## Additional Information
- Languages: English(native), Italian(fluent)
CSS
The repository layout includes two .css files:
css/normalize.css
Ensures all components render the same, regardless of the browser. You can get the latest version from the official normalize.css website.
css/default.css
Contains the actual styling for your CV, including:
- Background color
- Font family
- Font size
Tip
It’s recommended to import normalize.css from default.css like this:
@import "normalize.css";You can get a base default.css by expanding the section below:
Base default.css
@import "normalize.css";

@charset "UTF-8";

@page {
	padding: 0;
	margin-top: 1em;
	margin-bottom: 1em;
}

@paper {
	margin: 0;
	padding: 0;
}

@media screen {
	body {
		box-shadow: none;
	}
}

html,
body {
	font-family: Arial, Helvetica, serif;
	margin: auto;
	color: black;
	line-height: 1.5;
}

body {
	font-size: 11pt;
	padding: 0;
	margin: auto;
	background: #fff;
	background-color: #fff;
	border-radius: 3px;
	-moz-border-radius: 3px;
	-webkit-border-radius: 3px;
	-webkit-font-smoothing: subpixel-antialiased;
}

a {
	color: #4183c4;
	text-decoration: none;
}

p {
	margin: 1em 0;
}

ul {
	padding-left: 0;
}

li:not(:last-child) {
	margin-bottom: 3px;
}

h1,
h2,
h3,
h4,
h5,
h6 {
	margin: 10px 0 5px;
	padding: 0;
	font-weight: bold;
	-webkit-font-smoothing: subpixel-antialiased;
	cursor: text;
}

h1 {
	font-size: 27pt;
	color: black;
	text-align: center;
}

h2 {
	font-size: 16pt;
	border-bottom: 1px solid #ccc;
	color: black
}

h3 {
	font-size: 10pt;
	color: #333;
}

h4 {
	font-size: 10pt;
	color: #333;
	text-align: center;
	-webkit-margin-before: 0.02em;
	-webkit-margin-after: 0.02em;
}

h5 {
	font-size: 14px;
	color: #333;
	text-align: center;
}

h6 {
	color: #777;
	font-size: 14px;
	text-align: center;
	-webkit-margin-before: 0.05em;
}

p,
blockquote,
table,
pre {
	margin: 15px 0
}

body>h2:first-child {
	margin-top: 0;
	padding-top: 0;
}

body>h1:first-child {
	margin-top: 0;
	padding-top: 0;
}

body>h1:first-child+h2 {
	margin-top: 0;
	padding-top: 0;
}

body>h3:first-child,
body>h4:first-child,
body>h5:first-child,
body>h6:first-child {
	margin-top: 0;
	padding-top: 0;
}

a:first-child h1,
a:first-child h2,
a:first-child h3,
a:first-child h4,
a:first-child h5,
a:first-child h6 {
	margin-top: 0;
	padding-top: 0
}

h1+p,
h2+p,
h3+p,
h4+p,
h5+p,
h6+p,
ul li>:first-child,
ol li>:first-child {
	margin-top: 0
}

blockquote {
	border-left: 4px solid #DDD;
	padding: 0 15px;
	color: #777;
}

blockquote>:first-child {
	margin-top: 0
}

blockquote>:last-child {
	margin-bottom: 0
}

table {
	border-collapse: collapse;
	border-spacing: 0;
	font-size: 100%;
	font: inherit;
}

table th {
	font-weight: bold;
	border: 1px solid #ccc;
	padding: 6px 13px
}

table td {
	border: 1px solid #ccc;
	padding: 6px 13px
}

table tr {
	border-top: 1px solid #ccc;
	background-color: #fff
}

table tr:nth-child(2n) {
	background-color: #f8f8f8
}

img {
	max-width: 100%
}

code,
tt {
	margin: 0 2px;
	padding: 0 5px;
	white-space: nowrap;
	border: 1px solid #eaeaea;
	background-color: #f8f8f8;
	border-radius: 3px;
	font-family: Consolas, 'Liberation Mono', Courier, monospace;
	font-size: 12px;
	color: #333;
}

pre>code {
	margin: 0;
	padding: 0;
	white-space: pre;
	border: 0;
	background: transparent
}

pre {
	background-color: #f8f8f8;
	border: 1px solid #ccc;
	font-size: 13px;
	line-height: 19px;
	overflow: auto;
	padding: 6px 10px;
	border-radius: 3px
}

pre code,
pre tt {
	background-color: transparent;
	border: 0;
}

sup,
sub,
a.footnote {
	font-size: 1.4ex;
	height: 0;
	line-height: 1;
	vertical-align: super;
	position: relative
}

sub {
	vertical-align: sub;
	top: -1px;
}

@media print {
	body {
		background: #fff;
	}

	img,
	pre,
	blockquote,
	table,
	figure {
		page-break-inside: avoid;
	}

	body {
		background: #fff;
		border: 0;
	}

	code {
		background-color: #fff;
		color: #333 !important;
		padding: 0 .2em;
		border: 1px solid #dedede;
	}

	pre {
		background: #fff
	}

	pre code {
		background-color: white !important;
		overflow: visible
	}
}
Justfile
The just utility allows us to save and run predefined commands easily.
Our Justfile:
out_dir := "output"
in_dir := "markdown"
css_file := "css/default.css"

build: init
    for md_file in {{in_dir}}/*.md ; do \
    FILE_NAME=$(basename $md_file .md); \
    echo "Processing: $FILE_NAME"; \
    pandoc \
    --standalone \
    --self-contained \
    --css {{css_file}} \
    --from markdown \
    --to html \
    --metadata title='' \
    --output {{out_dir}}/$FILE_NAME.html $md_file > /dev/null; \
    \
    pandoc \
    --standalone \
    --self-contained \
    --from html \
    --to pdf \
    --pdf-engine=weasyprint \
    --metadata title='' \
    --output {{out_dir}}/$FILE_NAME.pdf \
    --css {{css_file}} \
    {{out_dir}}/$FILE_NAME.html; \
    done

init:
    mkdir -p {{out_dir}}

clean:
    rm -r {{out_dir}}
Explanation
This Justfile automates the process of converting Markdown files to both HTML and PDF formats. Here’s a brief overview of the commands:
- build: Runs the init command to create the output directory, then processes each Markdown file in the input directory:
- Converts Markdown to HTML.
- Converts HTML to PDF.
- init: Creates the output directory.
- clean: Deletes the output directory.
The conversion to PDF in two steps (Markdown to HTML, then HTML to PDF) is more stable with the CSS applied inline.
Key pandoc flags:
--standalone: Generates a standalone file.--from: Specifies the input format.--to: Specifies the output format.--self-contained: Embeds resources (like CSS) into the output file.--metadata title=...: Sets the document title.--output: Defines the output file path.
Github Action
This workflow will be triggered on any git push to the main branch, you can push via your PC/phone/etc, and it will automatically generate your CV.
Our build.yaml:
name: Build CV
on:
  push:
    branches:
      - main
  # Allows you to run this workflow manually from the Actions tab
  workflow_dispatch:

permissions:
  contents: write

jobs:
  build-cv:
    runs-on: ubuntu-latest
    env:
      PYTHON_VERSION: '3.12'
      JUST_VERSION: '1.29.1'
      WEASYPRINT_VERSION: '62.2'
    steps:
      - name: Checkout
        uses: actions/checkout@v4

      - name: Install Python
        uses: actions/setup-python@v5
        with:
          python-version: ${{ env.PYTHON_VERSION }}

      - name: Install weasyprint
        run: pipx install 'weasyprint==${{ env.WEASYPRINT_VERSION }}'

      - name: Install pandoc
        run: sudo apt install --yes --no-install-recommends --no-install-suggests pandoc

      - name: Install just
        uses: extractions/setup-just@v1
        with:
          just-version: ${{ env.JUST_VERSION }}

      - name: Build
        run: just build

      - name: Set Environment Variables
        run: |
          # Get PDF files
          echo 'PDF_FILES<<EOF' >> $GITHUB_ENV
          find output/ -type f -name '*.pdf' >> $GITHUB_ENV
          echo 'EOF' >> $GITHUB_ENV

          # Get Current Datetime
          echo "NOW=$(date +'%Y-%m-%d-%H-%M-%S')" >> $GITHUB_ENV

      - name: Release
        uses: softprops/action-gh-release@v2
        with:
          name: CV Compiled on ${{ env.NOW }}
          tag_name: CV-${{ github.sha }}
          files: ${{ env.PDF_FILES }}
Wrap Up
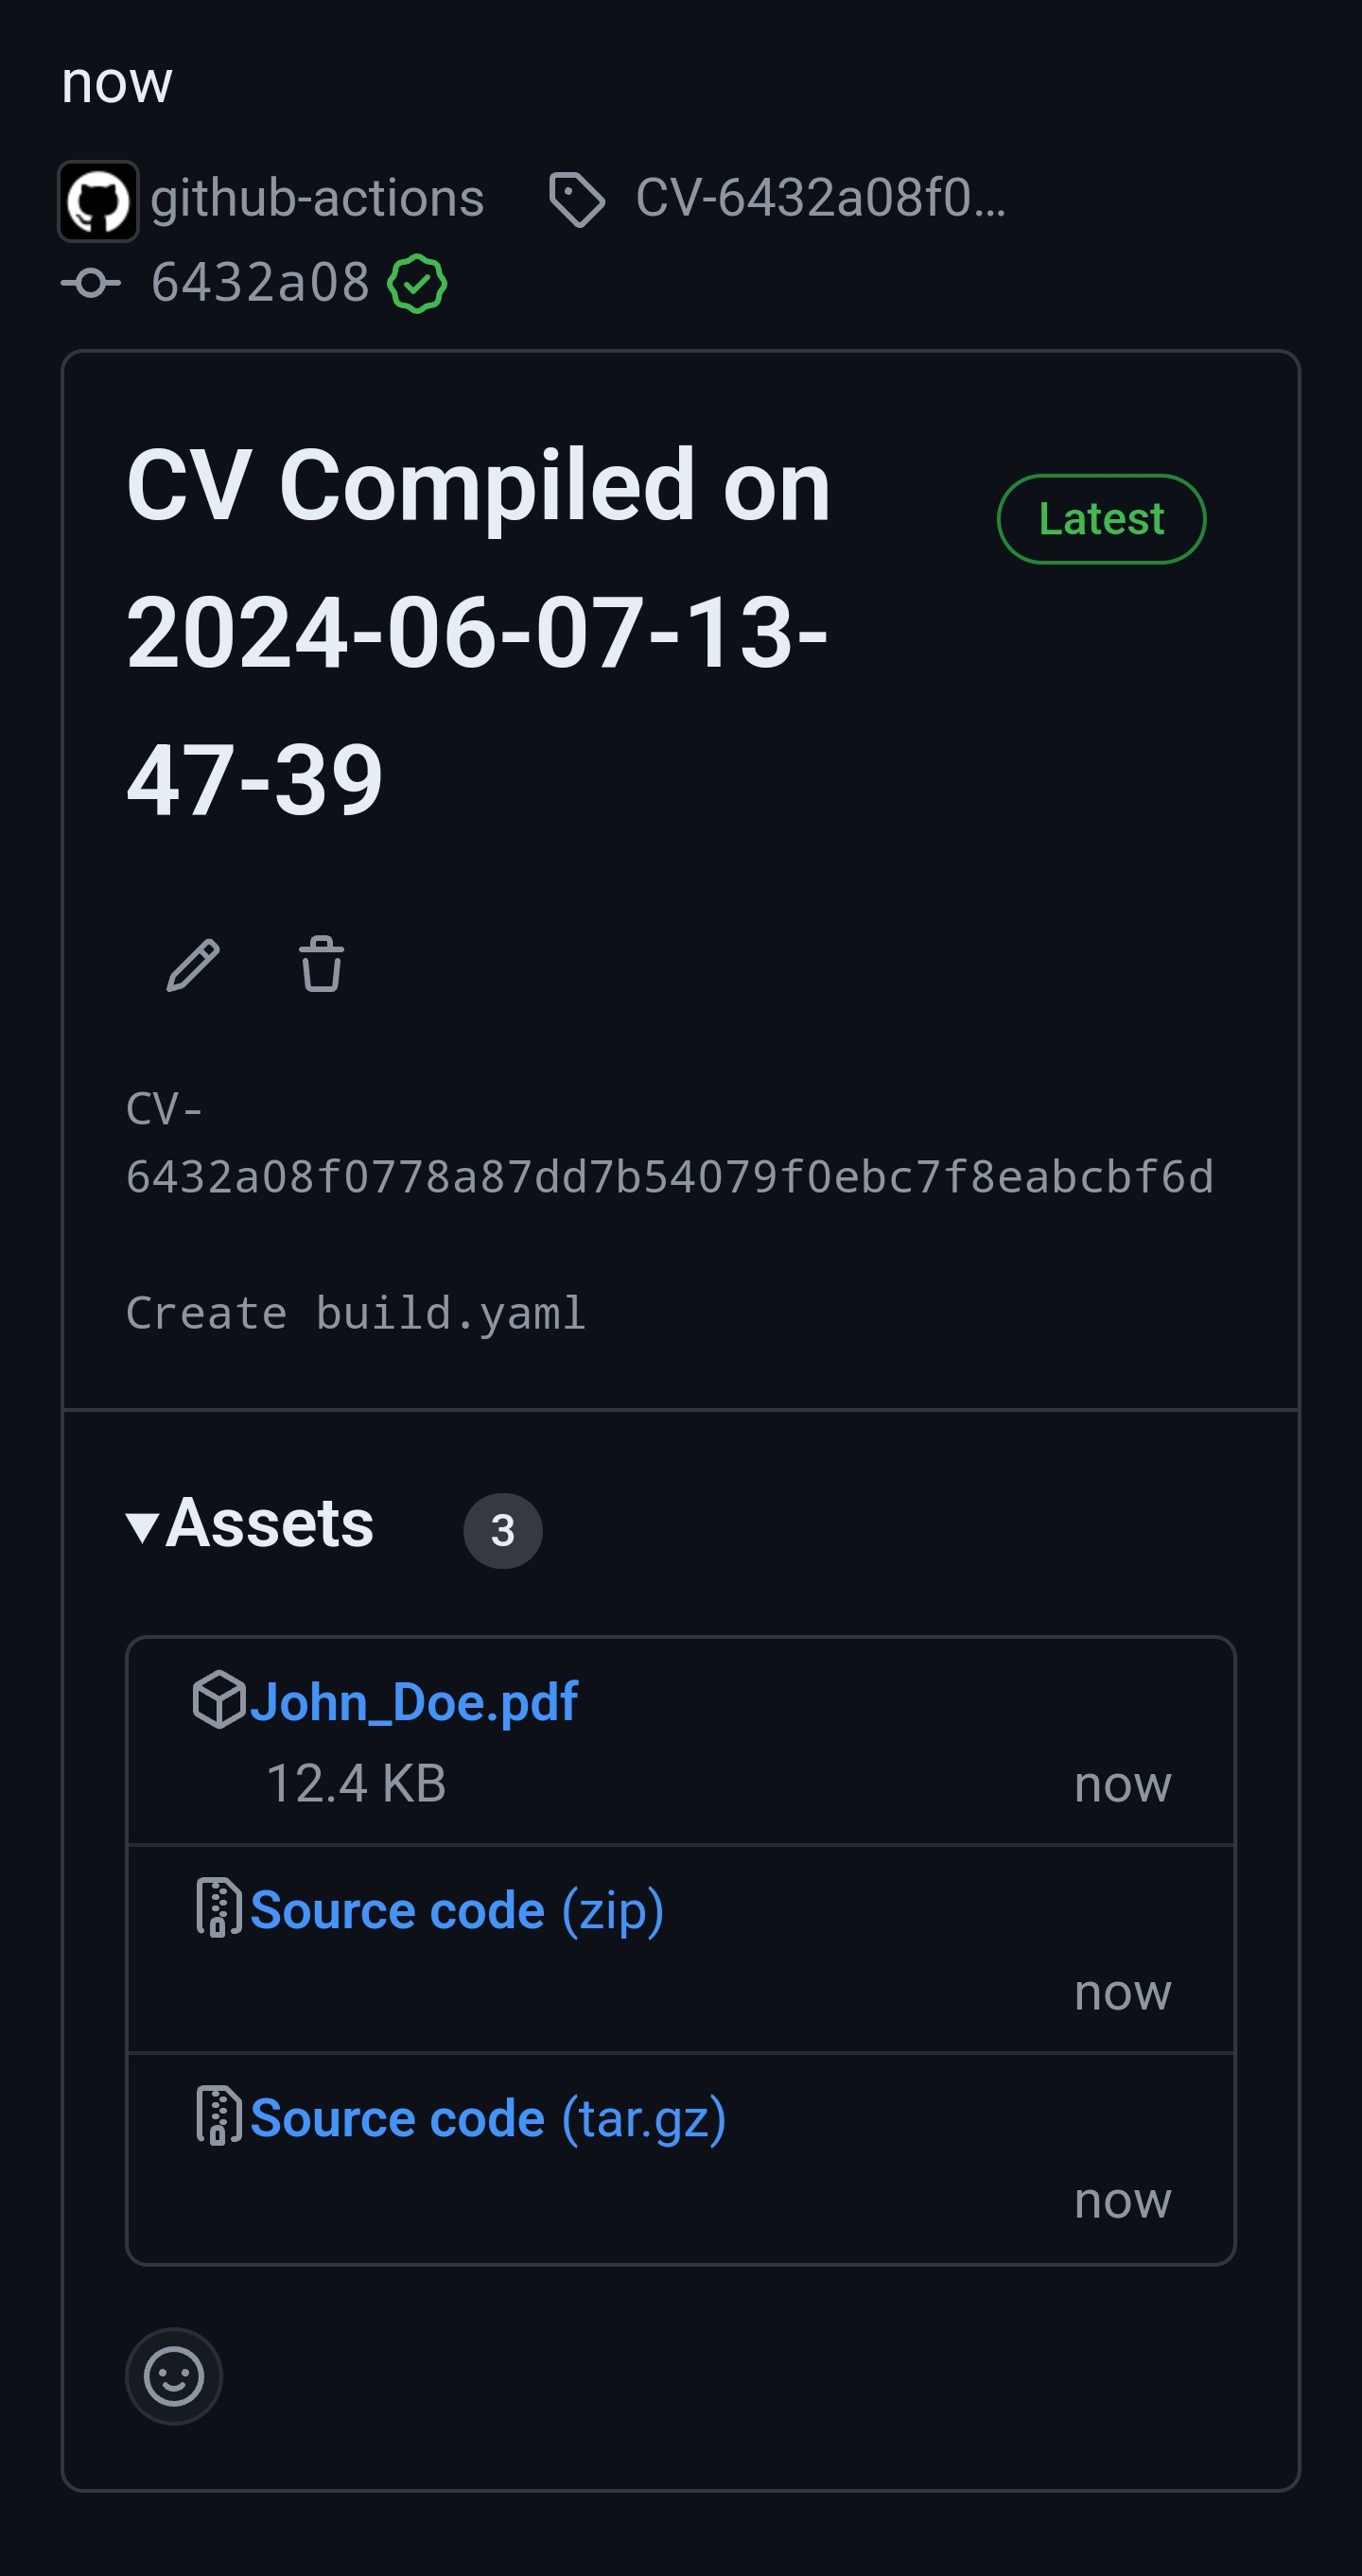
If everything is set up correctly, you should see a new release on the main repository page:

Clicking on it, you will see your PDF file(s) under “Assets”:
PDF output: